When deciding upon server architecture, most businesses start out with a single server architecture and then build up as needs present themselves. With this tutorial we are going to give you a quick run through of taking your server environment to a position where you have a lot more redundancy at a low cost. This tutorial is all based on the cheapest possible setup with Digital Ocean.
In order to be able to follow this tutorial you are going to need a basic knowledge of how to connect to servers via SSH and how to get setup your application or database on these servers. We also generally use Ubuntu as our server of choice, however this tutorial will be vaguely the same across most versions of Linux.
Here is a diagram of the most common server setup.
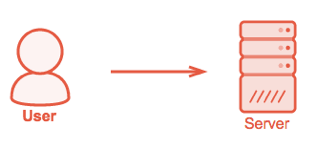
In this example, everything runs on just one server. We typically use LEMP stacks, which stands for Linux, NGINX, MySQL and PHP. This is where most people start off with a website. The biggest issues is their is no redundancy in this stack and it is not scalable past this point if their is a spike in demand. This setup of this stack is around £4 ($5) per month at its cheapest with Digital Ocean.
The next easy step is to integrate a service like CloudFlare. CloudFlare operate a global network that automatically optimises the delivery of web pages and mitigates against DDoS attacks. They do this by distributing your site assets through a CDN and through their extremely fast DNS. The best thing about the service is that their basic package is free!
The next step to getting a resilient system in our infrastructure journey is as follows,
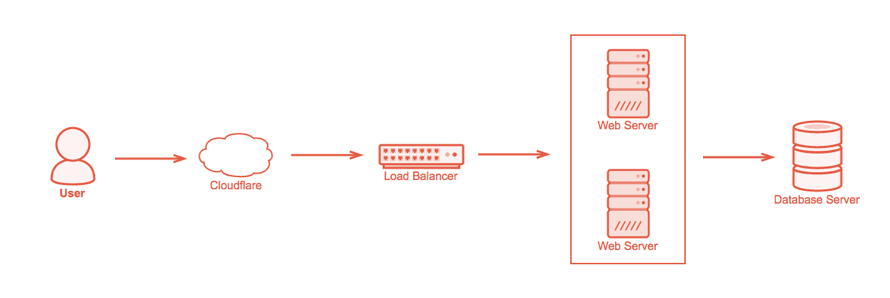
As you can see, we are routing from CloudFlare to our Load Balancer and then from our Load Balancer to two web servers. These are then connecting to a database server. This setup is the first step in enabling us to begin to horizontally scale and start to be able to deal with high levels of traffic. At it’s cheapest, this setup is £16 ($20) with Digital Ocean, with each of the servers being on a £4 ($5) droplet. A more optimal setup would probably be a £4 ($5) load balancer, each web server and the database server at £8 ($10) each. Putting the monthly cost at around £27 ($35) in total.
Their are now two points of failure that we will need to deal with in the future, these are the load balancer and database. The load balancer issue can be resolved by having two load balancers and creating a high availability setup, Digital Ocean have a great article on setting this up on their architecture here. The database issue would start to be taken care of by creating read and read/write database servers. Another optimisation to this setup would be to add a a shared Redis or Memcached server for the Web Servers to get cached data from (before having to access the database server), this and the database changes would require changes to the application code and structure and therefore will not be covered in this guide.
Getting Started
Your first step in this Journey is going to be to create your Digital Ocean account and start creating servers. There are a couple of good articles here on how to setup a server. We are going to need to create 3 $5 servers, we recommend setting up an SSH key on the computer you will be using to connect to the servers and then adding your SSH key to your Digital Ocean account, this will be a lot more secure than connecting to your servers with a password. We also recommend that you create the servers in or as near to the area where you and your customers are, for us that is in their London data centre. The reason behind only setting up 3 servers is that we will clone the second web server from the first web server once it is configured, as not to duplicate our efforts. Another note on server setup is that you need to make sure you enable private networking and also backups on the database server.
Webserver Setup
Most of the web servers that we setup are based on the LEMP stack. As our database will be on a separate sever we can skip the M part of LEMP.
Firstly SSH into your server and upgrade the packages repository,
sudo apt-get updateNext step is to install NGINX,
sudo apt-get install nginxAnd then install PHP,
sudo apt-get install php5-fpm php5-mysqlWe then need to configure php to work properly with NGINX. Edit the following php.ini file with the following command,
sudo nano /etc/php5/fpm/php.ini and then find the following line in the file,
cgi.fix_pathinfo=1and change it to,
cgi.fix_pathinfo=0After that we need to edit the www.conf file,
sudo nano /etc/php5/fpm/pool.d/www.confand find the following line in the file,
listen = 127.0.0.1:9000and change it to,
listen = /var/run/php5-fpm.sockOnce you have saved both of these files you will need to restart php with the following command,
sudo service php5-fpm restartAs CloudFlare will be serving up our SSL certificate, the NGINX config file can just be setup to server on port 80. No one will be able to access this server directly, as we will route everything through the load balancer and will then firewall all ports. You can then edit the NGINX config file with the following command,
sudo nano /etc/nginx/sites-available/defaultOur sample NGINX file will look something like this,
server {
        listen   80 default_server;

        root /var/www/site;
        index index.php index.html index.htm;

        location / {
                try_files $uri $uri/ /index.html;
        }

        location ~ \.php$ {
                try_files $uri =404;
                fastcgi_pass unix:/var/run/php5-fpm.sock;
                fastcgi_index index.php;
                fastcgi_param SCRIPT_FILENAME $document_root$fastcgi_script_name;
                include fastcgi_params;

        }
}
We then need to copy our php application into the /var/www/site folder.
Once that is done, you will need to restart NGINX for the configuration changes to take effect. Using the following command,
sudo service nginx reloadWe would then recommend that you follow our guide to get the most performance out of NGINX here.
The next step is to install a firewall with the following command,
sudo apt-get install ufwThe next step is to allow SSH access to the server,
sudo service ufw allow from any to any port 22Then allow port 80 access to the private ip address of the load balancer (http),
sudo service ufw allow from 192.168.0.0 to any port 80You will need to replace 192.168.0.0 with the private ip of your load balancer. Then enable the firewall,
sudo ufw enableYour next step is to shutdown the server,
sudo haltOnce complete, go to the Digital Ocean control panel and create an image of the web server. Then turn the server back on again, then create another box from the image of the web server, this will be your second web server. Now is also a good time for you to take a note of your servers private networking IP addresses, this can be seen in each individual severs settings. The benefit of doing this is that private networking traffic does not count towards your server traffic allowances.
Load Balancer Setup
Firstly SSH into your server and upgrade the packages repository.
sudo apt-get updateThen install NGINX,
sudo apt-get install nginxThen edit the NGINX config file,
sudo nano /etc/nginx/sites-available/defaultThe config file should look something like this,
upstream backend  {
  server backend1.example.com  max_fails=3  fail_timeout=15s;
  server backend2.example.com  max_fails=3  fail_timeout=15s;
}

 server {
  location / {
    proxy_pass  http://backend;
  }
}
You will need to replace backend1.example.com and backend1.example.com with the private network ip addresses that you got earlier. A sample might look like,
server 123.123.123.123  max_fails=3  fail_timeout=15s;
server 123.123.123.124  max_fails=3  fail_timeout=15s;
Once that is done, you will need to restart NGINX for the configuration changes to take effect. Using the following command.
sudo service nginx reloadYou should now be able to go to the load balancers external ip and it should route you internally to one of your load balanced servers. You might have issues though as your database server isn’t setup.
Next step is to install a firewall with the following command,
sudo apt-get install ufwThe next step is to allow SSH access to the server,
sudo service ufw allow from any to any port 22Then also allow port 80 access (http),
sudo service ufw allow from any to any port 80Then enable the firewall,
sudo ufw enableWe would then recommend setting up a floating ip address on the Digital Ocean dashboard for this server. CloudFlare will then point to this IP address.
As your web servers get under more strain, you will just be able to add more webservers to the pool and then add the ip addresses to the load balancer configuration,
MySQL Database Server Setup
The final bit of server setup is to setup mysql,
Firstly SSH into your server and upgrade the packages repository.
sudo apt-get updateThen to install MySQL, make sure you pick an ultra secure password.
sudo apt-get install mysql-serverThen activate it with this command,
sudo mysql_install_dbThen finish off the installation by running the secure install script,
sudo /usr/bin/mysql_secure_installationMake sure that you remove anonymous users, disallow root login remotely and remove the test database. It is then up to you to install your database on this server.
Once complete we will need to setup a firewall again,
sudo apt-get install ufwThe next step is to allow SSH access to the server,
sudo service ufw allow from any to any port 22Then also allow port 3306 access (MySQL) to the two web servers private ip addresses in place of 123.123.123.123 and 123.123.123.124,
sudo service ufw allow from 123.123.123.123 to any port 3306
sudo service ufw allow from 123.123.123.124 to any port 3306
Then enable the firewall,
sudo ufw enableWrapping Up
We will now need to setup CloudFlare and install your SSL certificate on their dashboard. We wont cover this as there are already quite a lot of documentation on the subject, just remember to point CloudFlare to the floating IP of your load balancer. The next step is to change your A Record with your domain name provider to point to CloudFlare.
If you decide to not use CloudFlare, you can always setup SSL on the load balancer instead.
As was stated previously, this guide is not comprehensive, but should give you a good place to start from.