
Following the beta release announcement of the Ionic 2 Framework a week and half ago (at the time of writing). Our interest in the framework was reignited, so we finally bit the bullet to see how easy the conversion of one of our existing projects to a hybrid app would be. Surprisingly easy it turns out! We did however run into a few minor hiccups along the way - no one said development was going to be easy! We'll expand upon our experience in this blog post.
What is AngularJS and Ionic and what are they used for?
AngularJS is a MVC JavaScript framework designed to make the development of front-end driven, dynamic web applications easier. It extends the HTML syntax to allow dynamic component expressions and supports functionality such as dependency injection, routing, form validation, deep-linking, templating, data binding. It also makes testing a near effortless process.
Ionic is an open-source SDK designed for creating hybrid mobile applications; it is written using AngularJS and built on top of Apache Cordova. And supports compiling using Phonegap, Apache Cordova and Trigger.io.
Initial project and stack setup
The existing project we chose for this experiment was originally written in AngularJS 1.4.8. Our current JavaScript backend stack currently includes bower, npm and gulp. We also make use of the awesome puphpet and vagrant setup for projects requiring extra server-side dependencies we wouldn't necessarily like to install on our local system, the use of puphpet and vagrant also ensures that every one of our developers has the same project setup regardless of their local machines – we cannot recommend it enough, but that's better left for a different blog post.
Prerequisites
In order to carry on with this process, you'll need to have node, npm and bower installed on your system.
If you don't already have node installed, you'll need to download and install your platform-specific version from their homepage. Node and npm are usually bundled together in the installation package. npm stands for node package manager, and as the name implies, is used to install node packages
Next, if you don't have bower installed, you may install it by running:
npm install -g bowerInstalling Ionic and Cordova
Open your favourite command-line terminal and install ionic and cordova respectively using npm via the following commands:
npm install -g ionic
npm install -g cordova
The '-g' parameter is a shorthand for '--global', and allows you to install the ionic and cordova packages globally so that they can be called from any folder and for any project.
Installing the Android SDK
In order for Ionic to compile for a particular platform, its SDK files need to be installed – in our case, android. You may download and install the android SDK into a folder of your choice. Once it's installed, ensure that your ANDROID_HOME environment variable correctly points to it. If you already have the Android SDK installed on your system, you may skip this step.
Creating the Cordova project
Navigate to your project root directory, and run the following command:
ionic start mobile_appThis creates a standard ionic app project for us to use.
Next, copy the contents of your web application and all of its assets into the "www" folder of the "mobile_app" directory replacing all of its contents. And then in your "index.html" file, you will have to add:
<script src="cordova.js"></script>At the bottom of the "head" element tag. Don't fret if your IDE tells you that the file does not exist, it will be injected in by ionic/cordova during the compilation.
Your "index.html" file must also include the "Content Security Policy" meta tag with all the appropriate whitelists. If you're unaware of what it is or why it's important, there's a good read on html5rocks.com, you should also have a look at this reference guide.
You'll also need to add 'ionic' to your list of dependencies in your "app.js" file. So that it looks like:
var modules = ['zmTemplates', 'zmGlobalServices', 'other modules ...'];
var dependencies = ['ngSanitize', 'other dependencies ...'];
var isMobile = typeof(ionic)!=='undefined' && (ionic.Platform.is("ios") || ionic.Platform.is("android"));
if(isMobile) {
    dependencies.push('ionic');
}

var ngModule = angular.module('sampleApp', dependencies.concat(modules))
    .config(function ($locationProvider, $compileProvider, AnalyticsProvider) {
       $locationProvider.html5Mode(true); // enable html5 mode
       // other pieces of code.
    })
    .run(function (application, $rootScope) {
       application.setPageTitle();
       $rootScope.$on('$stateChangeSuccess', function (event) {
          application.setPageTitle();
       });
       // other pieces of code.
   });
if(isMobile) {
   ngModule.run(function ($ionicPlatform) {
       $ionicPlatform.ready(function() {
       // Anything native should go here, like StatusBar.styleLightContent()
       if (window.StatusBar) {
          // org.apache.cordova.statusbar required
          StatusBar.styleDefault();
       }
    });
}
Now on your terminal, navigate to the "mobile_app" folder by running: cd mobile_app.
And add the platform we'd like to support, in our case 'android' by running:
ionic platform add androidThe process should be fairly similar if you're compiling for iOS devices. Just replace 'android' with 'ios' in the command above.
If you'd like to view the application on your local desktop, you may do so by running the ionic serve command from inside your "mobile_app" directory.
Once the application is as expected, connect your android device to your local machine via a USB cable and then deploy it to your device by running:
ionic runIf it doesn't work as expected. Please ensure that your device allows you to sideload/install unsigned apk files. You will also need to enable USB debugging in order for Ionic to detect your device. Follow the instructions here to find out how to go about doing so.
In theory, that's all that should be needed to get your hybrid app up and running. But as I spoilt for you above, it wasn't all smooth sailing and we did run into various issues along the way.
Troubles along the way.
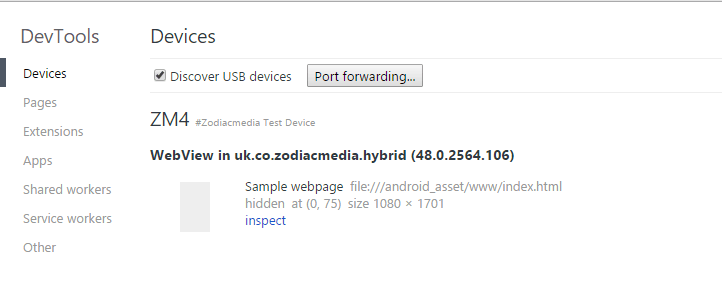
We ran into an issue where on deploying the app, we found ourselves greeted with a blank page with no visible errors. We were able to debug this issue by navigating to chrome://inspect?devices on Google Chrome on our desktop and clicking the "inspect" button.
With that, we were able to gain access to the web console and find that it was unable to load any of the assets:
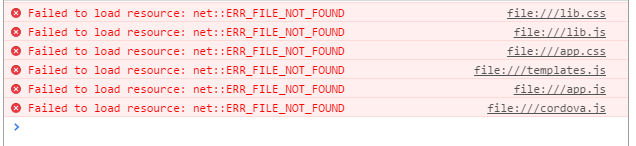
On further research, we found that the root cause of this was because we were making use of the angular html5mode and our base URL was incompatible with android's. This can be resolved in two ways:
- Disable html5mode in the $locationProvider and remove the base html tag, thus, but at the expense of angular no longer taking advantage of the HTML5 history API.
- Or keep html5mode and replace the base url with
'/android_asset/www/', and then ensure that all the href and src attributes are loaded as a relative asset rather than absolute. For example by changing<img src="/img/sample.png" />to<img src="img/sample.png" />.
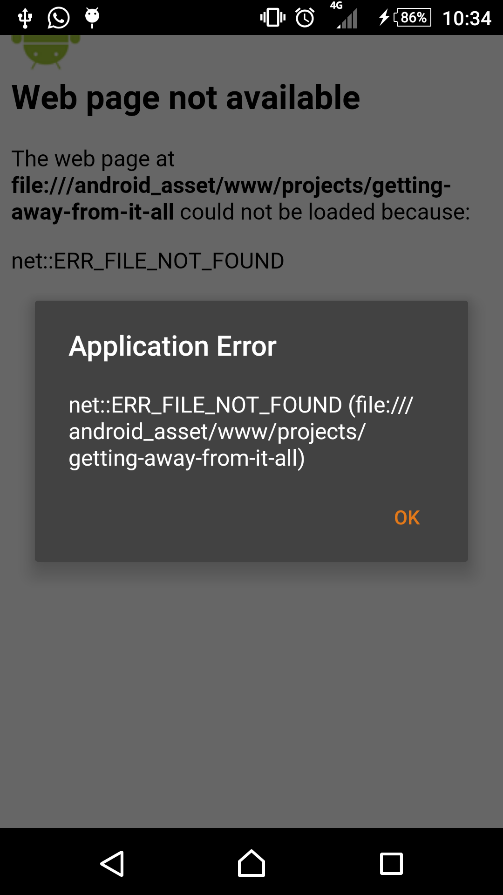
We originally opted for keeping html5mode enabled, but after a couple of hours of testing, it turns out this isn't a good solution if your web app allows you to navigate to external pages outside of your local content. This is because once you navigate to the external page, once you try navigating back to your app content, it attempts to load the non-existing file from the disk. This issue is usually mitigated by the use of an htaccess file (or equivalent) on servers, meaning this solution cannot be effectively applied here unfortunately. Our app unfortunately links to some external websites, so we ended up going back to option one and disabling html5mode. And then updated our "app.js" to disable html5 mode if we're mobile but keep it enabled on desktop devices:
angular.module('sampleApp', dependencies.concat(modules))
    .config(function ($locationProvider, $compileProvider, AnalyticsProvider) {
       $locationProvider.html5Mode(!mobile); // disable html5 mode on mobile devices.
       // other pieces of code.
    })
Our angular project also made use of google analytics where its JavaScript files were loaded as a protocol-relative URL, it turns out these types of URLs are unsupported due to the way assets are inherently loaded in cordova - via the filesystem. A scheme must be explicitly specified for every external asset used, otherwise it attempts to use the file:// scheme.
Streamlining the process.
We didn't want to duplicate our existing codebase or manually copy it every time we wanted to deploy to a mobile device, so we decided to integrate the ionic commands and file modifications into our local gulp file – this simplifies the process of generating the required assets for any future hybrid applications we decide to create in the future. This way we can update both the desktop site and the mobile application from the same codebase. This is where gulp really shines and gives you a small glimpse into how powerful it can truly be.
We were able to create two simple gulp tasks to simplify creating the application.
First, we added our gulp/npm dependencies by running:
npm install yargs --save
npm install path-exists --save
npm install exec-plan --save
npm install gulp-shell --save
npm install gulp-dom --saveyargs: Allows us to read in parameters passed to the gulp command.
path-exists: As the name implies, allows us to check if a file or folder exists on the disk.
exec-plan: Allows us to run a series of commands sequentially.
gulp-shell: Allows us to run a simple shell command as a gulp task.
gulp-dom: Allows us to dynamically modify the dom of an HTML file.
Specifying the '--save' command persists the dependency to your local package.json file.
At the top of our gulp file, we imported the dependencies and set up our variables:
var gulp = require('gulp');
var dom = require('gulp-dom');
var shell = require('gulp-shell');
var argv = require('yargs').argv;
var pathExists = require('path-exists');
var ExecPlan = require('exec-plan').ExecPlan;
var execPlan = new ExecPlan();

var mobile = argv.mobile; // --mobile parameter is present.
var projectIndexDir = './app'; // original codebase
var mobileDestination = 'mobile_app';

if(mobile) {
    // change the default directory
    destinationDir =  mobileDestination + '/www';
} else {
    destinationDir = 'build';
}
Once that was done, we added the appropriate tasks for setting the mobile project, running it and modifying its assets.
// create the mobile server application files.
gulp.task('mobileserver:setup', function(cb){
    pathExists('./'+mobileDestination).then(function (mobileProjectExist) {
        if(!mobileProjectExist) {
            console.log("Mobile project dir `"+ mobileDestination + "` does not exist. Creating it...");
            var options = {
                'appname': 'Sample-app', // ionic args don't support spaces yet. You'll have to update the config.xml manually if you want spaces.
                'id': 'uk.co.zodiacmedia.hybrid',
                'template': 'blank'
            };

            var ionicArgs = "";
            for (var key in options) {
                ionicArgs += "--" + key + " " + options[key] + " ";
            }
            ionicArgs += ' ' + mobileDestination;
            console.log('ionic start ' + ionicArgs);

            execPlan.add('ionic start ' + ionicArgs, errorHandler);
            // Remove unused files and folders, we will populate it ourselves.
            execPlan.add('rm ' + mobileDestination + '/www/css -rf', errorHandler);
            execPlan.add('rm ' + mobileDestination + '/www/img -rf', errorHandler);
            execPlan.add('rm ' + mobileDestination + '/www/js -rf', errorHandler);
            execPlan.add('rm ' + mobileDestination + '/www/lib -rf', errorHandler);
            execPlan.add('rm ' + mobileDestination + '/scss -rf', errorHandler);
            execPlan.add(function (stdout) {
                process.chdir('./' + mobileDestination); // change the working directory.
            },'ionic platform add android');

            execPlan.execute(); // run tasks sequentially.
        } else {
            console.log("Mobile project dir `" + mobileDestination + "` already exists. Skipping...");
        }
    });
});

// dynamically modify the index.html dom if we're on mobile.
gulp.task('index', function () {
    gulp.src([projectIndexDir + '/index.html'])
        .pipe(dom(function(){
            if(!mobile) {
                // No need to modify the dom if we're not compiling for mobile.
                return this;
            }

            var insertAfterLast = function(document, elementTag, element) {
                var elementTags = document.querySelectorAll(elementTag);
                var lastElement = elementTags[elementTags.length-1];
                lastElement.parentNode.insertBefore(element, lastElement.nextSibling);
            };
            var baseEl = this.querySelector('base');
            if(baseEl) {
                // Support HTML5 mode on android devices (only if the base element exists in the dom).
                baseEl.href = '/android_asset/www/';
            }
            // Include the cordova.js asset as well as the content-security policy to prevent XSS and other vulnerabilities on mobile devices.
            var cordovaJs = this.querySelector('script[src="cordova.js"]');
            if(!cordovaJs) {
                var cordovaScriptEl = this.createElement('script');
                cordovaScriptEl.src = "cordova.js";
                insertAfterLast(this, 'script', cordovaScriptEl);
            }
            var contentPolicyMeta = this.querySelector('meta[http-equiv=Content-Security-Policy]');
            if(!contentPolicyMeta) {
                var meta = this.createElement('meta');
                meta.setAttribute('http-equiv', 'Content-Security-Policy');
                meta.setAttribute('content', "default-src 'self' data: gap: https://ssl.gstatic.com https://www.google-analytics.com; style-src 'self' 'unsafe-inline'; media-src *");
                insertAfterLast(this, 'meta', meta);
            }
            return this;
        }))
        .pipe(gulp.dest( './' + destinationDir ));
});

// deploy our local application files to the connected device.
gulp.task('mobileserver', shell.task([
    'ionic run'
], {
    cwd: './' + mobileDestination
}));
We also added the 'mobileserver' task to our local 'watch' task, but only if the '--mobile' argument is specified. The local watch task handles the list of gulp tasks to run when a file in a particular directory changes (matched via a glob).
gulp.task('watch', function() {
    var extraMobileTasks = mobile ? ['mobileserver'] : [];
    gulp.watch([projectIndexDir + '/**/*.js'], ['appJS'].concat(extraMobileTasks));
    gulp.watch([projectIndexDir + '/sass/**/*.scss'], ['appCSS'].concat(extraMobileTasks));
    gulp.watch([projectIndexDir + '/index.html'], ['index'].concat(extraMobileTasks));
    // other gulp watch tasks (fonts, images etc.) ...
});
That's it! If you'd like to know more about gulp, we suggest you have a read through their documentation.
Final Thoughts
The transformation process was a very interesting one, I didn't like the idea that most of the issues we ran into were not included in their FAQ and I had to dig into github issues to find solutions for some of them.
Positives:
- I found the
ioniccommand-line interface to be very well documented and powerful with lots of commands encapsulating most of Cordova's functionalities so you no longer have to run anycordovacommands. - Before running our app, I ran a demo of their 'tabs' application, and was very impressed by its responsiveness. I think Ionic really shines when the application has been developed from the ground up using its framework so that you can successfully leverage most of its native API bindings.
Negatives:
- I found that the final result was a bit on the heavy side, with it getting a bit janky after a while – but I think this was most likely due to website we ported being very graphics, animation and processing intensive – it was developed as a desktop-first application and wasn't very optimized for mobile devices. We also noticed it was slightly less optimized than if the original website was loaded via the dedicated Google Chrome application.
Overall, I think the transformation process was a success - we have a mobile application to show for it! If your mobile application requires lots of processing power, lots of animations etc., you're better off sticking to native or to develop it mobile-first and benchmark as much as possible to ensure that the final product doesn't have a really bad user-experience.