
Welcome to Part 1 of my Capistrano 3 tutorial series. This post covers installing Capistrano and getting to the point where we can create our first Capistrano deploy scripts.
This will be a techie and complex post as the subject matter is not trivial. I am assuming that you have basic familiarity with Linux and the command line. It will definitely be worth persevering through this tutorial series though as once complete your deployment process will be far easier. This is the hardest part of the tutorial series, it does get easier!
And with that...let's begin.
The problem we're trying to solve
Our hypothetical problem is still the same one I used for my Cap v2 series and is as follows:
I am the manager of a development team consisting of about a dozen developers of varying skill levels. We work on multiple websites which we manage as a service for our clients. Our development process consists of three different environments:
- Development
- Staging
- Production
We use Subversion (aka SVN) for version control and a LAMP stack for our websites. Yes we've heard (and believe) that Git has several advantages over SVN but for business reasons we haven't made the jump yet, that battle will be fought another day. All of our servers run using Ubuntu, specifically the 12.04 LTS release. We really like Ubuntu as an operating system as the package management is a cinch.
Our current development process is as follows:
- Developers do their development work on checked out copies of our various projects which run on their local Development machines.
- When a developer is happy with their code changes they commit them back into SVN.
- Periodically SVN tags are taken of a project's codebase. Each SVN tag represents a release candidate for a project.
- The code contained in an SVN tag is released onto the Staging server for testing. The Staging server is as identical as possible to the Production server (e.g. operating system, versions of packages installed etc) so that the likelihood of an uncaught bug appearing in Production is minimised.Each project has its own method of deploying a release candidate to Staging. At best this process is a fully automated bespoke Bash script but some projects rely on developers running though a list of manual commands run (e.g. SVN export followed by rsync followed by several manual file edits).
- If a tag passes testing on Staging then it will be published to the Production server. The same deploy process that was used to publish to Staging will be re-used for publishing to Production.
Releasing has proven to be a painful, time consuming process and recently there have been a few mistakes made by developers causing embarrassing downtime on some of our sites. Developers are complaining that deployment is becoming a Sisyphean task and they're looking to me to come up with some improvements. I've heard great things about Capistrano and want to give that a shot starting with our smallest project "Example.com". The ultimate aim is to get to "one line deploys" for both Staging and Production versions of Example.com. I also want to ensure that deployment is a permissioned activity as only senior developers should be able to push code to Staging or Production, that way they maintain control of the project.
Installing Capistrano 3 on Ubuntu 12.04 LTS
To get Capistrano 3 up and running we need to:
- Install Ruby 1.9+
- Install Capistrano 3
- Setup our Linux users and permissions
You can install Capistrano on any Linux server you want really as long as there is connectivity between that server, the SVN server and the Staging and Production servers. Capistrano will need to use the Subversion client to interact with our Subversion repository, so make sure the Ubuntu subversion package is installed on the Capistrano server and the target deploy servers (i.e. Staging and Production).
Installing Ruby 1.9+
Capistrano v3 needs Ruby 1.9+ to run. The ruby package in Ubuntu 12.04 corresponds to version 1.8.7 so this won't do. Fortunately there are also the packages ruby1.9.1-full and ruby1.9.3 available in Ubuntu 12.04. Running:
sudo apt-cache show ruby1.9.3
Returns:
Ruby uses two parallel versioning schemes: the `Ruby library compatibility version'
(1.9.1 for this package), which is similar to a library SONAME, and the `Ruby version'
(1.9.3 for this package). Ruby packages in Debian are named using the Ruby library
compatibility version, which is sometimes confusing for users who do not follow Ruby
development closely. This package depends on the ruby1.9.1 package, and provides
compatibility symbolic links from 1.9.3 executables and manual pages to their 1.9.1
counterparts.
So 1.9.3 is really a proxy package to 1.9.1, but we might as well go with it. Run the following to install ruby1.9.3
sudo apt-get install ruby1.9.3
After successfully installing Ruby run
ruby --version
This should show that Ruby 1.9.3 is installed.
Upgrading to Ruby 1.9.3 from a pre-1.9 version
If you are already running a version of Ruby that is older than 1.9 then you can still install Ruby 1.9.3 by following the instructions detailed above. Once ruby1.9.3 is installed then you will need to use the update-alternatives command to switch Ubuntu to using the new 1.9.3 package. See: http://askubuntu.com/questions/91693/how-do-you-uninstall-ruby-1-8-7-and-install-ruby-1-9-2 for more details. If you're running any other Ruby projects then you'll have to update the gems installed for them using bundle update. You may have to uninstall the old 1.8 gems first (see: http://leonard.io/blog/2011/12/installing-ruby-1-9-2-on-ubuntu-11-10-oneric-ocelot-without-using-rvm/#uninstall). Obviously you need to take due consideration when upgrading your version of Ruby as it is likely to require downtime on Ruby powered sites so is best not done ad-hoc on a live server!
Installing Capistrano 3
Before you jump in and install Cap v3 please be aware that it is not backwards compatible with Cap v2. If you're installing Cap v3 on a server you already use Cap v2 on then your deploy scripts will no longer function. You can read advice on upgrading Cap v2 scripts to be Cap v3 compatible here: http://www.capistranorb.com/documentation/upgrading/. If you follow this tutorial series all the way through then it should be obvious what you have to do to upgrade your Cap v2 scripts.
To install cap v3 simply run:
sudo gem install capistrano
Then type the following to confirm that Capistrano installed ok:
cap --version
Setting up our Linux users and permissions
Another section, another caveat! At the time of writing Cap v3 doesn't support Subversion. Git has become the de facto standard for version control so this is understandable. There are still a lot of Subversion based projects out there and the hope of the Capistrano project team is that the community will contribute the code needed to support version control systems other than Git. I see that Mercurial support has already been added so I've picked up the gauntlet and contributed basic Subversion support via the Capistrano GitHub project. It will take time for this code to make its way into the production Capistrano RubyGem so you can add it to your local Capistrano installation to enable it in the meantime.
To do this we first need to find where Capistrano is installed:
sudo updatedb
locate capistrano
You're looking for a directory along the lines of:
/var/lib/gems/1.9.1/gems/capistrano-3.0.1
Add the following files to include Subversion support in your Cap v3 installation:
/var/lib/gems/1.9.1/gems/capistrano-3.0.1/lib/capistrano/svn.rb with contents:
load File.expand_path("../tasks/svn.rake", __FILE__)
/var/lib/gems/1.9.1/gems/capistrano-3.0.1/lib/capistrano/tasks/svn.rake with contents:
namespace :svn do
  desc 'Check that the repository is reachable'
  task :check do
    on roles(:all) do
      execute :svn, :info, repo_url
    end
  end

  desc 'Copy repo to releases'
  task :create_release do
    ask(:svn_location, "trunk")
    on roles(:all) do
      execute :svn, :export, "#{repo_url}/#{fetch(:svn_location)}", release_path
    end
  end
end
As you can see this facilitates a very simple deployment strategy of exporting the contents of an SVN repository location to the intended release path.
Now our Capistrano 3 installation supports Subversion let's continue setting up users and permissions.
Understanding how Capistrano works
To understand our users and permissions setup fully we have to know how Capistrano works at a high level.
When you run a Capistrano deploy the following happens:
- Capistrano checks your Subversion repository is reachable by running an
svn infoquery against your repository from your local machine (i.e. the one Capistrano is installed on). - Capistrano establishes an SSH session with the target server you are deploying to and then from there it remotely invokes an
svn exportcommand to deploy the codebase to a specified folder on that server. - Capistrano then updates a symlink on the target deploy server to point to this folder containing the new release. Your webserver uses the symlink location as the root folder of your website.
This means for us our Capistrano situation resembles the following diagram:
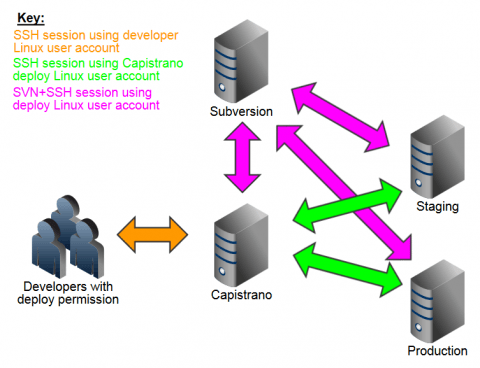
The above is theoretical as it's unlikely you'll create a dedicated VPS just to install Capistrano on. In reality you'll probably install Capistrano on a suitable existing VPS.
Note the colours of the arrows in the diagram above. In order to set up Capistrano we will have to setup these relationships.
Set up the Capistrano Linux deploy user account
On the Capistrano server we'll create a new user called deploy and a new group called deploy. We're going to store our Capistrano deploy scripts in the home directory of the deploy user (i.e. /home/deploy/). With the correct Linux file system permissions applied then only users who are members of the deploy group (you and your trusted senior developers) will be able to run a Capistrano deploy or edit a deploy script.
NB Other tutorials on the web seem to advise storing Capistrano scripts in the root directory of your application but there is no requirement to do this. I prefer to store my Capistrano scripts in their own version control repository rather than in each application's repository. I also want to restrict the access to them so keeping them all in one permissioned folder works well for me.
To create the deploy user on the Capistrano server type:
sudo adduser deploy
Give the user a temporary password and just leave the rest of the information blank. Now type:
sudo passwd -l deploy
This locks the deploy account so it is available to root only.
We need to create an SSH key for this new deploy user. We can do this as follows:
Start a sudo shell:
sudo -s
Switch to the newly created deploy user:
su deploy
Generate an SSH key for the deploy user:
ssh-keygen -t rsa
Press enter to accept saving the file in the default location (/home/deploy/.ssh/id_rsa) and then just press enter twice when asked to set a password. This ensures this SSH key is passwordless which we want as it will be laborious to have to enter another password in the deploy process. Don't worry all deployers will have to enter their own SSH key password when attempting to deploy so this is still secure.
Now exit the sudo shell by typing:
exit
You will have to add a deploy user and generate an SSH key for every server that Capistrano will be communicating with (i.e. Subversion, Staging and Production in this example). This is important!
Granting a user the ability to deploy
In order to grant a Linux user permission to run a Capistrano deploy we're going to have to do the following:
- On the Capistrano server: Add them to the
deploygroup. This is so they can access the Capistrano deploy scripts stored in thedeployuser's home folder. - On the target servers to deploy to: Add their SSH key to the
deployuser's/home/deploy/.ssh/authorized_keysfile. This is so they have access to the target deploy servers to make filesystem changes etc. - On the Subversion server: Add their SSH key to the
deployuser's/home/deploy/.ssh/authorized_keysfile. This is so they have permission to use the svn+ssh protocol.
You'll have to perform these tasks for every Linux user you want to grant deploy capabilities to. As a convenient example let's do all of the above for your own Linux account now.
Adding a user to the deploy group
Adding a user to the deploy group is simple, just run the following command replacing your_username with your actual Linux username:
sudo usermod -a -G deploy your_username
You can confirm this was successful by listing all of the groups that a user is a member of using:
groups your_username
You should see deploy in the returned list.
Adding a user's SSH key to the deploy user's authorized_keys file on the target deploy server
Adding an SSH key to the deploy user's authorized_keys file is slightly more fiddly.
Login to your Linux account on the target Capistrano server and list the contents of the .ssh folder within your home folder by typing:
ls -la ~/.ssh
If you've generated an SSH key for your account in the past then should see a couple of files named:
id_rsa
id_rsa.pub
If these files aren't here then run the following to generate them now:
ssh-keygen -t rsa
You'll be prompted for a password. Enter one and remember it as you'll need it each time you deploy.
You'll have to get all your developers to generate SSH keys for their own Linux accounts if they don't have them already.
Now you have to append your key to the deploy user's authorized_keys file on the target deploy server. So, open up another SSH session and log into the target deploy server and then start a sudo shell:
sudo -s
Change to the deploy user's home directory:
cd /home/deploy
Append your Linux account's SSH key from the Capistrano server into the file called authorized_keys using vi (or your favourite Linux text editor). Then set the ownership and permissions for the authorized_keys file as follows:
chown deploy:deploy /home/deploy/.ssh/authorized_keys
chmod 600 /home/deploy/.ssh/authorized_keys
And that's it, to exit the sudo shell run:
exit
Configuring Subversion
This is where the complexity of the setup goes up slightly. We'll be using the svn+ssh protocol (see http://svnbook.red-bean.com/en/1.7/svn.serverconfig.svnserve.html#svn.serverconfig.svnserve.sshauth) to access the SVN repos when performing a Capistrano deploy. We use this protocol as it allows us to achieve our goal of passwordless deploys.
As mentioned previously the Subversion client must be installed on the Capistrano server and the target servers we want to deploy to (Staging and Production). If you haven't installed Subversion already you can achieve this by running:
sudo apt-get install subversion
To enable SSH tunnelling edit the file /etc/subversion/config on each server and uncomment the following line in the [tunnels] section:
ssh = $SVN_SSH ssh -q -o ControlMaster=no
And modify the line to read:
ssh = $SVN_SSH ssh -q -o ControlMaster=no –l deploy
The –l parameter specifies the Linux user account when establishing an SSH session to the remote machine. Adding this to the SVN config file means that when someone uses the svn+ssh protocol they are limited to using the deploy user on the Subversion server. We do this as it allows us to tightly control access to the svn+ssh protocol.
I should note that if you run SSH on a non-standard port on your servers then this line should be modified to:
ssh = $SVN_SSH ssh -o ControlMaster=no -l deploy -p XXXX
Where XXXX is the port number you're running SSH on.
Now we're going to create the authorized_keys file for the deploy user on the Subversion server. After you've logged into your Linux account on the SVN server start a sudo shell and edit the authorized_keys file:
sudo –s
cd /home/deploy/.ssh
vi authorized_keys
Add to this file:
- The SSH keys of your deployers (i.e. privileged developers).
- The SSH key of the
deployuser account on the Capistrano server. - The SSH keys of the
deployuser accounts on the target servers to deploy to (Staging and Production).
You should increase security by restricting what SSH sessions on the Subversion server can be used for by placing the SSH keys in the format:
command="svnserve -t --tunnel-user=deploy",no-port-forwarding,no-agent-forwarding,no-X11-forwarding,no-pty TYPE KEY COMMENT
Substituting:
TYPEfor the key type (e.g. ssh-rsa)KEYfor the long SSH keyCOMMENTfor the SSH key comment
This forces all svn+ssh protocol connections to use the SVN username deploy. You can in turn set this SVN account to be limited to read only access within your Subversion repository's configuration.
For more information on this see http://svnbook.red-bean.com/en/1.7/svn.serverconfig.svnserve.html#svn.serverconfig.svnserve.sshauth.
Creating your first Capistrano script
Now all of the users and permissions are configured we can finally create some Capistrano scripts for our Example.com project. We'll store our Capistrano deploy scripts in a folder called capistrano within the home folder of the deploy user on the Capistrano server. We do this as only users in the deploy group will be able to read or edit the scripts and placing the scripts in one location will make it easy to import them into a dedicated capistrano SVN repository for safe keeping.
On the Capistrano server create the aforementioned folder:
mkdir –p /home/deploy/capistrano
Now for our Example.com project we'll create another directory called example:
cd /home/deploy/capistrano
mkdir example
To create the default set of Capistrano deploy scripts type:
cd /home/deploy/capistrano/example
cap install
You'll see output along the lines of:
mkdir -p config/deploy
create config/deploy.rb
create config/deploy/staging.rb
create config/deploy/production.rb
mkdir -p lib/capistrano/tasks
If you type:
cap –T
You'll be shown a list of all possible commands you could run for the example project using Capistrano.
That's it for this instalment. If you've got this far then you've covered the hard yards. In the next instalment in this series we'll move on to the more exciting task of creating a skeleton Capistrano deploy script for our Example.com project.